Author: multiplat

  • Step-by-Step Website Migration WHM to a Server Without a Panel

    ON OLD WHM/cPanel SERVER

    1. Login via SSH or File Manager

    Use SSH or cPanel File Manager.

    bash
    cd /home/USERNAME/public_html

    2. Export the WordPress files

    bash
    tar -czf theinvestigatornews.com.ng_files.tar.gz .

    3. Export the database

    First, get the database name from wp-config.php.

    Then run:

    bash
    mysqldump -u USERNAME -p DATABASE_NAME > theinvestigatornews.com.ng_db.sql

    Compress it:

    bash
    tar -czf theinvestigatornews.com.ng_db.tar.gz theinvestigatornews.com.ng_db.sql

    TRANSFER TO NEW SERVER

    4. Use SCP or rsync to copy both files to the new server

    From WHM server:

    bash
    scp theinvestigatornews.com.ng_files.tar.gz root@5.189.175.241:/home/theinvest/
    scp theinvestigatornews.com.ng_db.tar.gz root@5.189.175.241:/home/theinvest/

    ON NEW SERVER (NGINX UBUNTU)

    5. Extract files

    bash
    cd /home/theinvest/theinvestigatornews.com.ng
    tar -xzf /home/theinvest/theinvestigatornews.com.ng_files.tar.gz
    chown -R www-data:www-data .

    6. Import database

    bash
    cd /home/theinvest/
    tar -xzf theinvestigatornews.com.ng_db.tar.gz
    mysql -u root -p theinvest_wp74gk8 < theinvestigatornews.com.ng_db.sql

    7. Double-check wp-config.php

    Ensure it’s already using:

    php
    define( 'DB_NAME', 'doma_wp36' );
    define( 'DB_USER', 'doma_wp36' );
    define( 'DB_PASSWORD', 'ci[ud@mwD,{Qci[ud@mwD,Q' );
    define( 'DB_HOST', 'localhost' );

    And optimized settings already provided earlier.


    ✅ 8. Check permissions & restart services

    bash
    chown -R www-data:www-data /home/theinvest/theinvestigatornews.com.ng
    sudo systemctl restart php8.3-fpm
    sudo systemctl restart nginx
  • How to Extract or Decompress wp-content.tar.gz Using the Linux Command Line

    How to Extract or Decompress wp-content.tar.gz Using the Linux Command Line

    ✏️ Excerpt: Learn how to extract .tar.gz or .zip backup files like wp-content.tar.gz using simple Linux terminal commands. This tutorial is perfect for WordPress developers, sysadmins, or anyone restoring website backups. 📄 Post Content (HTML-Formatted for WordPress Editor): html Copy Edit

    📦 How to Extract wp-content.tar.gz on Linux

    If you’re restoring a WordPress backup or moving files between servers, you may come across archive files like wp-content.tar.gz or wp-content.zip. Here’s how to safely extract them using the command line.

    1. For .tar.gz Files

    Run the following command to extract a .tar.gz archive in the current directory:

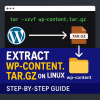
    tar -xzvf wp-content.tar.gz

    Explanation of flags:

    • x — extract
    • z — uncompress gzip
    • v — verbose (show progress)
    • f — specify filename

    To extract into a specific directory:

    tar -xzvf wp-content.tar.gz -C /home/naomiso/naomisophyblog.com.ng/wp-content/

    2. For .zip Files

    If your archive is a .zip file, use the unzip command:

    unzip wp-content.zip

    To extract to a specific folder:

    unzip wp-content.zip -d /home/naomiso/naomisophyblog.com.ng/wp-content/

    🔧 Need to Install tar or unzip?

    If these commands are missing on your server, install them with:

    For Ubuntu

    sudo apt install tar
    sudo apt install unzip

    For AlmaLinux
    sudo yum install tar sudo yum install unzip

    ✅ Conclusion

    Now you know how to handle both .tar.gz and .zip files when working with WordPress backups on a Linux server. Always make sure you’re extracting into the correct directory and have the right permissions set for www-data or your web user.

    Need help with permissions or WordPress setup? Drop a comment below or contact our support.

  • Compressing wp-content Folder Using Linux Command Line (ZIP & TAR.GZ Guide)

    Compressing wp-content Folder Using Linux Command Line (ZIP & TAR.GZ Guide)

    To compress the wp-content folder via terminal, use one of the following commands depending on your preferred archive format:

    🔹 To compress as .zip:

    bash
    zip -r wp-content.zip wp-content

    🔹 To compress as .tar.gz (recommended for Linux):

    bash
    tar -czvf wp-content.tar.gz wp-content

    🔹 To compress as .tar (uncompressed tarball):

    bash
    tar -cvf wp-content.tar wp-content

    These commands should be run from the directory containing the wp-content folder.
    Let me know if you want to exclude any subfolders or files.

  • How to Rename a Website Folder Using Terminal

    How to Rename a Website Folder Using Terminal

    To rename the directory /home/naomisophy to /home/naomiso, follow the steps:

    sudo mv /home/naomisophy /home/naomiso

  • How to Download and extract WordPress via Terminal

    How to Download and extract WordPress via Terminal

    cd /tmp
    wget https://wordpress.org/latest.zip
    unzip latest.zip
    sudo mv wordpress/* /home/naomisophy/naomisophyblog.com.ng


    Replace this /home/naomisophy/naomisophyblog.com.ng with your website directory

  • How to Upload a File to Your Server via SCP from your window PC

    How to Open PowerShell on Windows

    You can open PowerShell easily using either a keyboard shortcut or the Start Menu. Here’s how:


    Method 1: Quick Keyboard Shortcut

    1. Press Windows Key + X

    2. From the menu, select Windows PowerShell or Terminal (Admin)

    🔐 Use “Terminal (Admin)” if you need administrative privileges.


    Method 2: Using the Start Menu

    1. Click the Start Menu (Windows icon at the bottom-left)

    2. Type PowerShell

    3. Click on Windows PowerShell or Windows Terminal from the search results

    4. 🔐 Right-click and choose “Run as administrator” if needed


    🧪 Example Command to Upload a File to Your Server via SCP

    After opening PowerShell, you can use this command to upload a file (e.g. a SQL backup) to your remote server:

    powershell
    scp "C:\Users\Multiplatforms\Downloads\Compressed\azzawaj_wp2dr5.sql.gz" root@161.97.68.33:/tmp/

    This command copies the file from your local Windows machine to the /tmp/ directory on your server.


    💡 Note: Make sure:

    • You have OpenSSH Client installed (usually preinstalled on Windows 10/11)

    • Your server allows SSH access

    • You replace the file path and IP with the correct details if different

  • How to Import a WordPress SQL Backup via Terminal (Example)

    Let’s assume you are importing a SQL backup file for a website called exampleblog.com.ng.

    🧾 Step-by-step Commands:

    bash
    # Step 1: Go to the directory where the SQL backup is located:
    cd /var/www/exampleblog.com.ng/public_html

    📂 This moves you into the folder where your .sql.gz file is stored.


    bash
    # Step 2: Decompress the SQL backup file:
    gunzip exampleblog_dbbackup.sql.gz

    🗜 This command unzips exampleblog_dbbackup.sql.gz into a usable SQL file: exampleblog_dbbackup.sql.


    bash
    # Step 3: Import the SQL file into the MySQL database:
    mysql -u root -p exampleblog_db < exampleblog_dbbackup.sql

    🔁 This imports the uncompressed SQL file into the MySQL database named exampleblog_db.

    🔐 Note: You’ll be prompted to enter the MySQL root password before the import begins.


    ✅ Summary of Variables Used:

    Variable Example Used Explanation
    Domain exampleblog.com.ng The website’s domain name
    SQL Backup File exampleblog_dbbackup.sql.gz Compressed database file
    MySQL Database Name exampleblog_db The database into which you’re importing
    MySQL Username root Administrative MySQL user
  • How to View All WordPress Users in Your Database Using Terminal

    How to View All WordPress Users in Your Database Using Terminal

    To see a list of all WordPress users in your database (zzle_wu3), you’ll need to run a SQL query on the wp_users table.

    🧾 MySQL Command:

    bash
    mysql -u root -p -e "SELECT ID, user_login, user_email, user_registered FROM zzle_wu.wp_users;"

    🔐 You will be prompted to enter your MySQL root password.

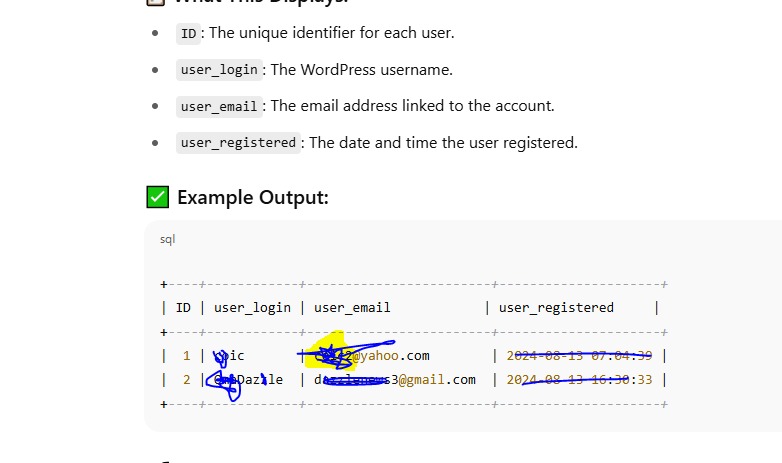
    📋 What This Displays:

    • ID: The unique identifier for each user.

    • user_login: The WordPress username.

    • user_email: The email address linked to the account.

    • user_registered: The date and time the user registered.

    ✅ Example Output:

    You can add \G at the end for vertical format if the output is too wide:

    bash
    mysql -u root -p -e "SELECT ID, user_login, user_email, user_registered FROM zzle_wu3.wp_users\G
  • Terminal: How to Change a WordPress User Password via MySQL (User: coic)

    🔐 How to Change WordPress Admin Password via MySQL (User: coip)

    Last updated: July 3, 2025

    🧰 Requirements

    • Access to your Linux server (SSH or terminal)
    • MySQL root access or database credentials
    • WordPress database name: zzle_wu

    🛠 Resetting the Password Using MySQL

    Run the following command to reset the password for the user coic:

    mysql -u root -p -e "UPDATE zzle_wu.wp_users SET user_pass = MD5('favour2025') WHERE user_login = 'coip';"

    This command uses the MD5 hashing algorithm, which is required by older WordPress versions to store passwords in the database.

    ⚠️ Security Warning

    MD5 is outdated and no longer considered secure. Although WordPress still supports it, newer versions use stronger hashing algorithms like bcrypt.

    After logging in with the new password, it’s recommended to immediately update the password again through the WordPress dashboard or WP-CLI to ensure it’s rehashed securely.

    ✅ More Secure Alternative Using WP-CLI

    If WP-CLI is available on your server, use this command instead for modern hashing:

    wp user update coip --user_pass=favour2025

    This is the preferred and more secure method to reset a WordPress password.

    📌 Tip: Always backup your database before performing manual operations.


  • Leading the Future of ICT Solutions

    Leading the Future of ICT Solutions


    The Story of Multiplatform Digital Information Technology Ltd. (Multiplatforms)

    At Multiplatform Digital Information Technology Ltd. (MDIT) — proudly known as Multiplatforms — our passion is empowering businesses through technology. As a full-spectrum IT solutions provider, we deliver a comprehensive range of digital services, setting a new standard for excellence in the industry.

    Our services cover everything a modern business needs to thrive:

    • Premium Website Development for all industries
    • High-Speed Web Hosting solutions
    • Creative Graphic Designs, including logos and banners
    • Professional Email Marketing and SEO Services
    • Targeted Digital Marketing and Online Advertising
    • Automated Programming Solutions
    • High-Quality Video Production and Live Event Coverage
    • Business and Company Branding
    • Corporate Registration (CAC Services)
    • TV/Radio Studio Setup and Livestream Solutions
    • System Maintenance and Management (Hardware & Software)
    • Cloud Hosting, Virtual Machines, VPS (Windows & Linux)
    • Professional Digital Training Programs
    • And much more — all enhanced with next-generation AI technologies.

    Proven Track Record of Business Transformation

    Over time, Multiplatforms has successfully completed numerous projects across various industries, helping businesses transition into the digital space with cutting-edge tools and strategies. Our track record is filled with stories of businesses that have seen real growth, improved efficiency, and increased profitability after working with us.

    The number of businesses that have trusted and transferred their services to Multiplatforms continues to grow daily. From startups to established enterprises, our clients have consistently praised the quality, creativity, and reliability that define our work.


    Voices of Our Clients: Testimonies That Speak Volumes

    Our clients’ words are our proudest achievements. Time and again, businesses we have served testify to:

    • The exceptional quality of our services
    • The fast and dependable support from our technical team
    • The personalized approach to every project
    • The innovative use of technology to meet unique business needs

    These testimonies are more than feedback; they are a reflection of our unwavering commitment to excellence.


    Trusted and Recommended: Why Multiplatforms Stands Out

    Because of our consistent performance, Multiplatforms has become a highly recommended name in the digital space. Our clients have enthusiastically referred us to others, knowing they are sending their friends, family, and colleagues to a brand that truly delivers.

    We are proud to be recognized as a leading ICT solutions provider, driven by innovation, quality service, and a passion for helping businesses succeed.


    Ready to Transform Your Business?

    At Multiplatforms, we don’t just offer services — we deliver results. Powered by next-generation AI tools and a team of top-tier professionals, we are ready to bring your ideas to life.

    Contact us today at +2349077260922, and +447367596463 let’s create the future of your business together!


  • How Daily Submission of Sitemap Helps Your Website Rank High on Google

    How Daily Submission of Sitemap Helps Your Website Rank High on Google

    At Multiplatforms, we understand the importance of a well-optimized website for your online presence. One of the most effective strategies to boost your site’s SEO is through the daily submission of a sitemap to Google. This simple yet powerful technique can significantly enhance your website’s visibility and help it rank higher in search results. In this article, we explore how regular sitemap submission positively impacts your website’s performance on Google.

    1. Faster Indexing

    One of the key advantages of submitting your sitemap daily is faster indexing. Google’s bots crawl the web constantly, looking for new or updated content. By submitting your sitemap on a daily basis, you are essentially giving Google a roadmap to your site, allowing its bots to discover and index any fresh content promptly. This means that newly added pages, blog posts, or updated information are more likely to appear in search results sooner, improving the chances of your website ranking higher in relevant queries.

    Remember that it is better to submit the sitemap daily; sometimes, you can even do it twice a day to keep Google updated on any fresh changes or additions.

    2. Accurate Content Representation

    A sitemap is essentially a blueprint of your website’s structure. It ensures that Google crawls and indexes all relevant pages, including those that might not be easily discovered through internal links. When you submit your sitemap daily, it keeps Google’s index up to date with any structural changes you make to your site. Whether you add new pages, products, or blog posts, daily submissions ensure that Google always has the most accurate representation of your website, ensuring that all critical content is considered for ranking.

    3. Enhanced Crawl Efficiency

    For websites with frequently changing content, such as blogs or news sites, frequent submissions help enhance crawl efficiency. Google’s crawl bots can miss new or updated content if they are not consistently informed about changes. Submitting your sitemap daily helps mitigate this risk by ensuring that Google’s bots stay up to date on your site’s additions and modifications. The more efficiently Google crawls your site, the more likely it is that your fresh content will be indexed and ranked appropriately.

    Read Also: Advert Content: Build Trust and Grow Your Brand

    4. Improved Ranking Signals

    Google rewards websites that maintain an active and dynamic content presence. Regular submissions of a sitemap act as a signal of activity and content freshness. When Google sees that a site is consistently updated and its sitemap is regularly submitted, it interprets this as a sign of relevance and authority. Websites that are updated frequently tend to be ranked higher by Google, as they are seen as offering timely and valuable information to users. Therefore, submitting your sitemap daily can directly contribute to improving your search rankings over time.

    5. Better User Experience

    A key element of SEO is ensuring that your users have a great experience when visiting your site. When your site is indexed quickly and accurately, users can find the content they need faster, leading to a better user experience. Google factors in user behavior signals like page load speed, time on site, and bounce rates into its ranking algorithm. By ensuring that your site is indexed accurately and that new content is readily accessible, you enhance the likelihood of longer visits and lower bounce rates, both of which can improve your site’s ranking.

    6. Optimization for New Pages

    If your website frequently introduces new products, services, or blog posts, daily sitemap submissions can be particularly beneficial. By submitting your sitemap every day, you ensure that these new pages get crawled and indexed without delay. This is especially important for businesses or websites that are regularly launching new offerings. Prompt indexing means that new content can appear in Google’s search results faster, giving it an opportunity to rank for relevant keywords sooner.

    Conclusion

    In conclusion, daily sitemap submission is a powerful and simple strategy to enhance your website’s SEO and improve its search engine rankings. By ensuring that your website’s content is indexed quickly and accurately, you increase the likelihood of ranking higher for relevant search queries. Remember, it’s better to submit your sitemap daily, and in some cases, submitting it twice a day can further enhance your website’s visibility and indexation speed. At Multiplatforms, we are committed to helping businesses optimize their online presence and achieve better SEO results. If you’re looking to improve your website’s performance, contact us today and let us guide you in implementing effective SEO strategies, including regular sitemap submissions.

  • Advert Content: Build Trust and Grow Your Brand

    Advert Content: Build Trust and Grow Your Brand

    🚀 Set Sail with Multiplatforms!
    Start your journey to success with a smashing logo and stunning banners. At Multiplatforms, we believe that:
    A well-designed logo adds beauty and professionalism to your website.
    Eye-catching banners elevate your branding.

    🎨 Our Expertise:
    Our versatile design team specializes in:

    • Social Media Graphics: Instagram posts/stories, Twitter headers, Facebook covers.
    • Print Media Designs: Flyers, posters, business cards, brochures.
    • Digital Graphics: YouTube thumbnails, blog banners, presentations.
    • Corporate Branding: Logos, letterheads, certificates.

    💼 Why Choose Us?

    • Affordable Pricing: Top-quality designs that fit your budget.
    • Proven Excellence: Trusted by countless customers for exceptional results.
    • Comprehensive Services: From social media graphics to book covers and everything in between.

    📞 Contact Us Today, via WhatsApp! +44 7367 596463
    Let’s craft designs that build trust and help you grow your brand.

  • Get Free SSL Certificates and Website Data Migration with Multiplatforms Hosting Packages

    Get Free SSL Certificates and Website Data Migration with Multiplatforms Hosting Packages


    The Importance of SSL Certificates in Web Hosting: A Focus on Multiplatforms Web Hosting

    An SSL (Secure Sockets Layer) certificate is crucial for any website, and when it comes to web hosting, it plays a significant role in ensuring the safety, trustworthiness, and efficiency of the service. For Multiplatforms web hosting, implementing SSL certificates is vital for both security and business success. Here’s why:

    1. Data Encryption
      SSL certificates encrypt the data exchanged between the web server and the user’s browser, ensuring sensitive information like passwords, payment details, and personal data is protected. Multiplatforms web hosting ensures your website visitors’ data is shielded from eavesdropping and cyberattacks, offering an additional layer of security that’s critical for any website.
    2. Building Trust with Visitors
      With SSL enabled, your website’s URL will begin with “HTTPS” rather than “HTTP,” and the padlock icon appears next to the address bar. For visitors on websites hosted by Multiplatforms, this reassures them that the site is secure. This is particularly important for e-commerce platforms and financial sites, where customer trust is paramount.
    3. Improved SEO Rankings
      Google ranks SSL-secured websites higher, prioritizing them over non-secure sites. For websites hosted on Multiplatforms, this can result in improved SEO rankings, leading to better visibility and more organic traffic. Multiplatforms web hosting’s integration of SSL certificates aligns with this SEO benefit, boosting your website’s search engine performance.
    4. Data Integrity
      SSL ensures that the data exchanged hasn’t been tampered with during transmission. Multiplatforms web hosting guarantees the integrity of the data being transferred, preventing “man-in-the-middle” attacks where attackers alter content or inject malware. It’s a proactive step in safeguarding both user data and your website’s reputation.
    5. Compliance with Regulations
      For websites that deal with user data, having an SSL certificate is often a legal requirement. For platforms hosted with Multiplatforms, this includes compliance with privacy regulations like GDPR, PCI DSS for e-commerce, and others. Ensuring SSL is enabled helps you stay legally compliant and avoid potential fines.
    6. Customer Confidence and Conversion
      A website with an SSL certificate is essential for gaining customer confidence, especially for businesses handling sensitive information. Multiplatforms web hosting ensures that your site’s security is in place, reducing the likelihood of cart abandonment and increasing conversion rates. SSL not only secures transactions but also enhances your brand’s reputation.
    7. Protection from Phishing
      SSL certificates provide protection from phishing attacks, which cybercriminals use to create fake websites to steal data. Websites hosted by Multiplatforms with SSL certificates are flagged as secure by browsers, reducing the likelihood of your site being impersonated in phishing scams. This protection builds further trust with your users.
    8. Better Website Performance
      Modern SSL protocols, such as TLS (Transport Layer Security), enhance security and can improve website performance by enabling faster data transmission with HTTP/2. With Multiplatforms web hosting, SSL implementation also leads to improved load times and a better overall user experience, making your website faster and more responsive.

    Click to order now!


    Conclusion
    In summary, SSL certificates are essential for securing user data, enhancing SEO, improving customer trust, and complying with legal standards. Websites hosted by Multiplatforms web hosting benefit from these advantages, ensuring both security and performance are top-notch. As SSL is a fundamental part of modern web hosting, partnering with a reliable provider like Multiplatforms guarantees your website remains secure, fast, and trusted by visitors.

  • 5 Reasons High GB RAM Hosting Boosts Your Website’s Success

    5 Reasons High GB RAM Hosting Boosts Your Website’s Success

    Why Hosting Your Website on a Server with High GB RAM Matters

    In today’s fast-paced digital world, website performance plays a pivotal role in user satisfaction and online success. One of the most crucial elements of performance is the server’s RAM capacity. Hosting your website on a server with high GB RAM offers a range of benefits that can significantly impact your online presence.

    1. Enhanced Website Speed

    High RAM servers process multiple requests simultaneously, ensuring faster page load times. This directly improves user experience and boosts search engine rankings.

    2. Seamless Traffic Management

    A server with high GB RAM can handle traffic surges effortlessly, ensuring your website stays online and functional even during peak periods.

    3. Optimal Performance for Dynamic Websites

    Dynamic websites with extensive databases, such as e-commerce platforms and interactive blogs, benefit greatly from high RAM. It enables quick data retrieval and smooth browsing experiences for users.

    4. Supports Multimedia-Rich Content

    If your website features high-resolution images, videos, or other large files, a server with ample RAM ensures these load seamlessly without compromising performance.

    5. Future-Proofing Your Website

    As your website grows in traffic and functionality, having high GB RAM ensures you’re ready for increased demands without frequent upgrades.

    Choose Multiplatforms Hosting Servers

    For the best hosting experience, Multiplatforms (available at multiplatforms.net) is the perfect choice for you. Their hosting servers come with high RAM capacity, optimized performance, and robust support, ensuring your website runs smoothly and efficiently at all times.

    Investing in a high-RAM hosting server is a smart move for your website’s future. With Multiplatforms, you get the reliability and power you need to succeed online. Get started today!

  • Experience Excellence in VPS Hosting for Just $6/Month!

    Experience Excellence in VPS Hosting for Just $6/Month!

    Pay Less & Save Big with MULTIPLATFORMS!

    Looking for affordable and reliable VPS or dedicated server solutions? Look no further! At MULTIPLATFORMS, we provide cheap, secure, and stable licenses tailored to meet your needs.

    Key Features:

    • Instant Activation: Get started immediately with our quick setup process.
    • Unlimited Accounts: Manage as many accounts as you need without extra charges.
    • Free Softaculous: Easily install your favorite applications with one click.
    • Free Sitepad Pro: Create stunning websites effortlessly with our user-friendly site builder.
    • Free Live Support: Our dedicated support team is here to assist you 24/7.
    • Unlimited IP Change: Change your IP address whenever you want, hassle-free.
    • All Updates from cPanel: Enjoy the latest features and security updates automatically.

    All this for just $6/month!

    Ready to get started? Chat with us on WhatsApp at 09077260922 or visit our website at multiplatforms.net.

    Don’t miss out on this incredible opportunity to enhance your online presence!

  • “Multiplatforms: Your All-in-One Solution for Fast, Secure, and Scalable Websites”

    “Multiplatforms: Your All-in-One Solution for Fast, Secure, and Scalable Websites”

    When it comes to building a robust and high-performing website, the right hosting provider can make all the difference. At Multiplatforms, we specialize in providing premium website development and hosting services that offer the perfect blend of performance, security, and ease of use. Whether you’re an individual, a small business, or a large organization, our web solutions are designed to meet the ever-evolving needs of the modern digital landscape. Here’s why partnering with us to build your website can set you up for success.

    1. Unparalleled Performance: 12 GB of RAM and Up to 4x Faster Performance with Global Cloudflare CDN

    Speed and performance are the cornerstones of an effective website, and with Multiplatforms, you’ll benefit from both. We offer 12 GB of RAM, ensuring your website operates smoothly even during peak traffic hours. This amount of memory provides sufficient resources for websites that are content-heavy, run numerous applications, or handle large amounts of data, making your user experience faster and more seamless.

    To further enhance speed, we integrate the global Cloudflare CDN (Content Delivery Network). CDNs distribute your website’s data across various servers worldwide, meaning that users will access your site from the server closest to their location. This reduces latency and enhances loading times, no matter where your visitors are located. Thanks to this global infrastructure, you can enjoy up to 4x faster performance, a key advantage when user retention and conversion rates often depend on how fast your pages load.

    2. Unlimited Bandwidth: Scale Without Limits

    One of the most valuable benefits of hosting your website with Multiplatforms is the unlimited bandwidth. Unlike many hosting services that impose restrictions on data transfer, we allow you to scale your website without worrying about exceeding limits. Whether your site is getting steady daily traffic or experiencing surges due to seasonal promotions or viral content, unlimited bandwidth ensures your visitors experience no slowdowns or outages.

    This feature is especially critical for eCommerce websites, content-driven platforms, or media sites where performance consistency is essential. With no limits on bandwidth, your website remains fast and functional, no matter how many visitors you attract.

    3. Unlimited Email Accounts: Professional Communication Made Easy

    A professional website needs professional communication tools, and with Multiplatforms, you get unlimited email accounts. You can create customized email addresses linked directly to your domain, such as support@yourbusiness.com or sales@yourbusiness.com, enhancing your brand image and improving customer trust.

    This feature is invaluable for organizations of all sizes. Whether you have a team of five or five hundred, everyone can have their own domain-linked email address, improving communication flow and ensuring that your business remains professional and credible.

    4. Free SSL Certificate (Comodo): Secure Your Website for the Long Haul

    Security is non-negotiable in today’s digital world, and we take this seriously. At Multiplatforms, we provide a free SSL certificate (Comodo) for the entire duration of your hosting plan. An SSL certificate encrypts the data transmitted between your website and its users, making it harder for hackers or malicious actors to intercept sensitive information.

    This is particularly critical for websites handling personal data, financial transactions, or any kind of sensitive information. Additionally, SSL certificates improve your website’s search engine ranking, as Google now prioritizes HTTPS-secured sites. With the secure padlock symbol displayed next to your URL, you’ll boost user trust and comply with data protection regulations.

    5. Free Domain: Establish Your Online Identity

    Your domain is your website’s online identity, and with Multiplatforms, you get a free domain when you sign up for hosting. This takes the hassle out of the domain registration process, allowing you to choose and secure your desired web address quickly and easily.

    Having a personalized domain name gives your website a professional edge and enhances brand recognition. Whether you’re starting a blog, launching an online store, or building a corporate website, a free domain ensures you have a solid foundation to begin your online journey.

    6. Advanced Web Technologies: Apache PHP-FPM & Nginx PHP-FPM for Superior Performance

    Modern websites require modern technology, and with Multiplatforms, you’ll benefit from advanced server setups including Apache PHP-FPM and Nginx PHP-FPM. These technologies improve your website’s performance by managing PHP processes more efficiently, which is essential for handling dynamic content, database queries, and complex functionalities.

    Whether you’re running a WordPress blog, a Joomla site, or a custom PHP application, these server technologies ensure your site remains fast, reliable, and scalable. They are particularly useful for websites that experience fluctuating traffic or require efficient load balancing, as they help maintain speed and stability even during high-traffic periods.

    7. Web Application Firewall: Fortify Your Website’s Security

    At Multiplatforms, we don’t just focus on speed; we also prioritize security. Our hosting service includes a Web Application Firewall (WAF) that protects your site from common threats such as SQL injections, cross-site scripting (XSS), and brute-force attacks. A WAF acts as a barrier between your website and the internet, filtering and monitoring incoming traffic to block malicious requests.

    In today’s digital environment, having a WAF is crucial for maintaining the integrity of your website, preventing data breaches, and safeguarding user information. With our WAF in place, you can rest assured that your website is secure from vulnerabilities, leaving you free to focus on what really matters—growing your business.

    8. Social Share Automation Plugins: Expand Your Reach Effortlessly

    In the age of social media, sharing your content across multiple platforms is essential for increasing your website’s visibility. With our social share automation plugins, you can automatically post your website’s updates, blog posts, products, and other content to your social media handles.

    This feature simplifies the process of promoting your website and saves time by automating routine tasks. Whether you’re targeting Facebook, Twitter, Instagram, or LinkedIn, you can maintain a consistent online presence across various platforms, driving more traffic back to your website without any extra effort.

    9. Premium, Advanced SEO Plugins: Get Found on Search Engines

    Search Engine Optimization (SEO) is critical for increasing your website’s visibility and driving organic traffic. We provide premium, advanced SEO plugins that help you optimize your site for search engines like Google, Bing, and Yahoo. These plugins analyze your website’s structure, content, and metadata, offering suggestions and improvements to boost your search rankings.

    From keyword integration to improving your site’s load time, these SEO plugins take care of the technical details, ensuring that your site ranks higher in search results. By increasing your visibility, you’ll attract more visitors and potential customers, making it easier for your target audience to find you online.

    10. Free Support Services: Assistance Every Step of the Way

    At Multiplatforms, we understand that building and maintaining a website can sometimes be challenging, especially if you’re not a tech expert. That’s why we offer free support services for the entire duration of your hosting plan. Our team of skilled professionals is available to assist you with any technical issues or queries, from setting up your website to resolving performance-related concerns.

    Whether you need help with a plugin, a configuration issue, or simply advice on optimizing your site’s performance, our support team is here to ensure that your website stays up and running smoothly, allowing you to focus on your business rather than technical problems.

    Conclusion

    Building a website with Multiplatforms means harnessing the power of advanced technologies, unlimited resources, and expert support. From superior performance with 12 GB of RAM and Cloudflare CDN to unmatched security with a free SSL certificate and Web Application Firewall, we offer everything you need to create and manage a successful website. Add to that unlimited bandwidth, email accounts, premium SEO tools, and social media automation, and you have a complete web hosting solution that empowers your online presence.

    For more information and inquiries, contact us at **09077260922** or visit our website at [www.multiplatforms.net](http://www.multiplatforms.net). We look forward to helping you build a powerful, secure, and high-performing website!

  • How to set up Ubuntu server to host a website using the Linux, Apache, MariaDB, and PHP stack (LAMP)

    How to set up Ubuntu server to host a website using the Linux, Apache, MariaDB, and PHP stack (LAMP)

    A LAMP (Linux, Apache, MariaDB, PHP) stack is commonly used to prepare servers for hosting web content. This detailed guide will come in handy if you are planning to manage the server without a cPanel (control panel) installed. We will show how to install LAMP on the server with Ubuntu 16.04 or 18.04.

    All aforementioned versions of Ubuntu represent current Long-Term Releases (LTS) and use the same package manager apt (Advanced Package Manager).

    In this guide, we will set up recent versions of Apache, MariaDB, and PHP on a server with the hostname server1.ncsupport.info. Additionally, we will set up a basic

    configuration of LAMP to host a WordPress content management system and install its latest version at http://domain.tld.

    Prerequisites

    • Ubuntu 16.04 or 18.04 blank version. If you have a VPS with Namecheap, one of these operating systems can be installed using your access to the SolusVM management tool.
    • Internal server account with root access (#) or the one with sudo privileges. For simplicity, the following steps will be illustrated using the “root” account. Therefore, commands to be executed start with the “#” sign, which should not be copied.


    We recommend updating the operating system (OS) prior to proceeding with further steps.apt update
    apt upgrade

    If you see “0 upgraded, 0 newly installed, 0 to remove and 0 not upgraded” after running “apt upgrade”, you are using the most up-to-date software.

    It may be required to review and confirm/deny certain changes during the process. To answer “Yes” automatically, you can use the option “-y” with apt. For instance, “apt -y upgrade” instead of “apt upgrade.” This will be valid for any apt-based commands that follow.

    Another optional step is to reboot the server and check its current configuration.reboot
    uname -r
    lsb_release -a
    apache2 -v
    mysql -V
    php -v


    Above is a simple confirmation that our test environment does not have any Apache, MariaDB, and PHP modules installed yet.

    Step 1. Apache

    Installation

    The process is as simple as running a single command below:apt install apache2
    apache2 -v

    Initial basic configuration

    This time we need to edit the Apache configuration file. We will use the text editor “nano” but you can use one of your choice.

    The Apache main virtual host configuration file is /etc/apache2/sites-available/000-default.conf. Therefore, we can open it using the following command:nano /etc/apache2/sites-available/000-default.conf
    Use keyboard arrows to scroll down the file. You will need to change to lines: ServerAdmin and ServerName. ServerAdmin can be any email address you wish to send server notifications to. ServerName should be the hostname you set with HTTP port 80. Make sure that there is no comment (# sign) at the beginning of either ServerAdmin or ServerName lines.


    In case a domain name is pointed to the server, you can check the Apache start page. Feel free to use your own domain name. Alternatively, you should be able to see the start page of the Apache server when entering the IP address of the server in your web browser.

    If you do not remember the IP address assigned to the server, this command will come in handy:ip addr show eth0 | grep inet | awk ‘{ print $2; }’ | sed ‘s/\/.*$//’

    Configuring the firewall daemon

    Ubuntu comes bundled with a default firewall named Uncomplicated Firewall (UFW). It allows for the operating with so-called profiles that should ease the overall management of firewall rules. You can review the list of existing application profiles, check the status of the firewall, white-list certain profiles, and enable the firewall using the following commands:ufw app list
    ufw status
    ufw allow OpenSSH
    ufw enable

    NOTE: If you enable the firewall without white-listing the OpenSSH application with “ufw allow OpenSSH” first, it will not be possible to reconnect to the server via SSH. Therefore, it will be required to log in using VNC credentials: SolusVM VNC in case of VPS, or IPMI in the case of Dedicated Servers.

    As a part of our initial Apache setup, let’s make sure that any incoming external requests through ports 80 and 443 do not get blocked. By the way, you can check the profile’s description using the “ufw app info” command.

    ufw app info “Apache Full”
    ufw allow in “Apache Full”

    Step 2. MariaDB

    By default, Ubuntu can be set up with the MySQL server. MariaDB is a fully-functional and open-source counterpart drop-in replacement for MySQL – with more features and better performance. That is why we proceed with the installation of MariaDB within the main sequence of steps and leave the MySQL part as a bonus.

    Installation

    You can install MariaDB without the hassle only using “apt install mariadb-server mariadb-client.” However, you will get the MariaDB version 10.1, which may be considered outdated depending on your setup preferences. We will install MariaDB 10.4 which is currently considered a stable release. The instructions and commands to use are conveniently provided on the official web page of MariaDB:

    apt install software-properties-common

    apt-key adv –fetch-keys ‘https://mariadb.org/mariadb_release_signing_key.asc’

    add-apt-repository ‘deb [arch=amd64,arm64,ppc64el] http://mirror.wtnet.de/mariadb/repo/10.4/ubuntu bionic main’

    apt update

    We are now ready to install MariaDB 10.4:

    apt install mariadb-server

    mysql -V

    Running initial secure configuration script

    The MariaDB server comes with a security script that should be run as a part of the initial configuration. The script will go through the enabling unix_socket, the resetting of MariaDB’s own root password, the removal of anonymous users and the test database as well as the disabling of the remote root login, etc.

    The important part here is the unix_socket. In MariaDB 10.4.3 and later, the unix_socket authentication plugin is installed by default. It allows the user to use operating system credentials when connecting to MariaDB via the local Unix socket file. In certain cases, socket authentication may not meet your needs and create additional confusion. With that in mind, you have a chance to disable it when running the initial installation script at the step “Switch to unix_socket authentication [Y/n]”:
    Answering “Y” will enable the unix_socket authentication for the database root user
    Answering “n” will keep the mysql_native_password option enabled for the database root user instead

    Regardless of your decision, it can also be changed later.mysql_secure_installation

    In the end, you should see the message: Thanks for using MariaDB!

    Logging into MariaDB and creating the basic database

    You can launch the MariaDB command line interface using this command:

    mysql -u root -p

    The prompt will request a password. It must be the one that you just set for your root database access after going through the secure installation script. Afterward, the command line will allow you to manage the MariaDB server. Let’s create a basic database named “foo_db” and grant full access to this database for the MariaDB user “foo_user” with the password “foo_password”:MariaDB> CREATE DATABASE foo_db; GRANT ALL ON foo_db.* TO ‘foo_user’@’localhost’ IDENTIFIED BY ‘foo_password’;

    You can double-check the list of existing databases with “show databases;” prior to leaving the MySQL/MariaDB server with “quit.”

    Step 3. PHP

    Installing the recent PHP version

    Although it’s possible to install the PHP with “apt install php,” we will get the outdated PHP 7.2 only. This version is not actively supported anymore. Instead, we will focus on the most recent PHP environment version as of these days – 7.4. By the way, developers of WordPress recommend the use of PHP 7.4 or above.

    To get the up-to-date versions of PHP, you will need to add the extra repository:apt install software-properties-common
    add-apt-repository ppa:ondrej/php
    apt update
    apt install php
    php -v

    NOTE: If you have installed “software-properties-common” during the MariaDB installation, there is no need to run this command again.

    Adding the most common PHP extensions

    PHP 7.4 itself is not enough. For instance, WordPress requires at least 14 essential PHP extensions. In other words, we will need to double-check the presence of these and a couple of other popular PHP extensions with the following command (missing extensions will get installed):

    apt install php-cli php-curl php-gd php-json php-ldap php-mbstring php-mysql php-odbc php-soap php-xml php-xmlrpc php-zip

    Step 4. Testing LAMP

    At this point, LAMP stack is set up and ready to resolve content on the Internet. We can re-run our initial checks from the “Prerequisites” section of this article. Additionally, we will reboot the server to make sure that all changes are applied.reboot
    uname -r
    lsb_release -a
    apache2 -v
    mysql -V
    php -v

    By default, the server is set up to resolve the content of /var/www/html/ when accessed via an IP address or server’s domain name. To test this, let’s create a simple index.html file after renaming existing one:mv /var/www/html/index.html /var/www/html/index.html_bak
    nano /var/www/html/index.html
    <html>
    <head>
    <title>My website on Ubuntu</title>
    </head>
    <body>
    <h1>A simple index.html file</h1>
    <p>Test page for ncsupport.info</p>
    </body>
    </html>

    A combination of Ctrl+O and Ctrl+X will save the file and exit the “nano” text editor. Now, visiting your own website should resolve the content of the index.html file we have just created:


    You can also check your PHP environment with a simple PHPinfo() function:echo ‘<?php phpinfo(); ?>’ > /var/www/html/info.p

    Everything looks good! Keeping the PHPinfo() function file present on the server is not secure, however. Therefore, let’s prevent exposing sensitive information by removing it:rm /var/www/html/info.php

    Step 5. Installation of a WordPress script on a http://domain.tld

    Going through steps 1-4 will ensure that any domain name pointed to the server’s IP address will resolve the content of /var/www/html/. In most cases, this is not the ideal setup. Hosting separate content of several domain names, independently, will require a bit of extra tweaking.

    Creating website directory

    Basically, you need to create a folder to upload specific website files and tell Apache where specific hosted files are located. Let’s try hosting a WordPress website at http://domain.tld/. Replace “domain.tld” in each command listed below with your actual domain name in order to match your own setup.

    To start with, let’s create a folder which will store files of your new website. Once done, you need to change ownership permissions to the Apache user (each service has its own user) and set the appropriate www folder permissions to 755.mkdir -p /var/www/domain.tld
    chown -R www-data:www-data /var/www/domain.tld
    chmod 755 /var/www/domain.tld

    Editing the Apache configuration

    You will need to modify virtual hosts and create a virtual host file to make sure that correct content is served for a domain name. Instead of modifying existing default virtual host file /etc/apache2/sites-available/000-default.conf, let’s create a new one. Please remember to replace “domain.tld” with the actual domain name of yours:nano /etc/apache2/sites-available/domain.tld.conf
    <VirtualHost *:80>
    ServerAdmin admin@domain.tld
    DocumentRoot /var/www/domain.tld
    ServerName domain.tld
    ErrorLog /var/www/domain.tld/error_log
    CustomLog /var/www/domain.tld/access_log common
    </VirtualHost>

    Let’s enable the new virtual host file with an in-built tool “a2ensite” and check the syntax of Apache configuration files. If everything is fine, we will need to restart Apache to make sure that all custom changes are applied.a2ensite domain.tld.conf
    apache2ctl configtest
    systemctl restart apache2

    Besides, it’s worth enabling the .htaccess file. To do so, you need to find these lines at the beginning of the Apache main configuration file /etc/apache2/apache2.conf and change “AllowOverride None” to “AllowOverride All” within the section <Directory /> as illustrated below.

    Installing the latest version of WordPress script

    Currently, our http://domain.tld/ is pointed to the content of the directory /var/www/domain.tld and should resolve files stored in the directory (if any). The next batch of commands will allow you to download and extract WordPress files:cd /var/www/domain.tld
    wget http://wordpress.org/latest.tar.gz
    tar –strip-components=1 -xvf latest.tar.gz
    rm -f latest.tar.gz

    If everything goes well, refreshing http://domain.tld/ in the web-browser should lead to the default installation sequence of WordPress at http://domain.tld/wp-admin/setup-config.php. Using the details of a previously set up database “foo_db” you can finish the initial configuration and check your fresh WordPress website:


    Installing the MySQL database management system (bonus section)

    Installation

    If you wish to install MySQL on an Ubuntu-based server instead of MariaDB, the following command can be used. In the case of Ubuntu 18.04, MySQL 5.7 will be downloaded and set up automatically.apt install mysql-server
    mysql -V

    Running the initial secure configuration script

    MySQL has its own initial secure configuration script which is initiated with the following command:mysql_secure_installation
    The initial prompt will ask whether you would like to turn on the “Validate Password” plugin. If enabled, this plugin will test new passwords to make sure a predefined password strength is achieved. Levels of password validation policy are as follows:

    0 = LOW    Length >= 8

    1 = MEDIUM     Length >= 8, numeric, mixed case, and special characters

    2 = STRONG     Length >= 8, numeric, mixed case, special characters and dictionary file

    It is safe to leave validation disabled, but you should always use strong, unique passwords for database credentials. The rest of the prompts can be answered “Y” until you see the message “All done!”.

    Changing the authentication method for MySQL root user

    Unlike MariaDB, the root user in MySQL is set up with the authentication through the auth_socket by default. This can be double-checked with the following MySQL query:mysql> SELECT user,authentication_string,plugin,host FROM mysql.user;

    If you wish to use a password with the MySQL root user, mysql_native_password plugin has to be assigned instead of auth_socket. Please note that the change of plugin and assignment of a new password must be made with a single command. Make sure to use a strong password instead of “foo_password” from the example below:mysql> ALTER USER ‘root’@’localhost’ IDENTIFIED WITH mysql_native_password BY ‘foo_password’;
    mysql> FLUSH PRIVILEGES;

    Double-checking the setup should confirm that the change was successful and the root MySQL user now uses mysql_native_password.

    That’s it! You can now host and build websites based on a server with Ubuntu and LAMP stack.
  • How can a large SQL file be imported into phpMyAdmin?

    How can a large SQL file be imported into phpMyAdmin?

    When importing large SQL files into phpMyAdmin, you can often result in timeouts or server errors.

    Don’t worry!

    With the right approach and some optimizations, it is possible to import large SQL files into phpMyAdmin successfully.

    In this article, we will discuss the solutions with which you can easily import large SQL files in phpMyadmin.


    Also Read: How to Fix the 504 Bad Gateway Timeout Error?


    Solutions to Import Large SQL file in phpMyAdmin

    ➢ Solution-1: Compress SQL File

    If you have SQL files that are not much larger in size, you can use this solution to import the file in phpMyAdmin quickly.

    You just need to compress the .sql file using gzip or zip. You can also use any other compression method as well. With the help of this, you can achieve a major size reduction.


    Also Read: How to Download SQL Database From cPanel?


    ➢ Solution-2: Increase Your Server’s PHP File Size Limit

    If the solution mentioned above doesn’t work for you. Increasing your server’s PHP file size limit is another good solution that you can apply to solve this problem.

    To do this, you simply need to follow the following:

    ➔ You have to Open the ‘php.ini’ file on your server.

    ➔ In that, you just need to update the given lines below.

    max_execution_time = 1024    // 30 minutes

    max_input_time = 1024        // 30 minutes

    memory_limit = 2048M         // 2 GB

    upload_max_filesize = 2048M  // 2 GB

    post_max_size = 2048M        // 2 GB

    ➔ Once you update it, just save the file.

    After that, restart your web server to apply the changes.


    Also Read: How to Increase Max Upload Size in cPanel?


    ➢ Solution-3: Use MySQL Command in Terminal

    Another solution for solving this problem is to consider using the command line in your terminal to import the SQL file.

    To do this, you simply need to follow the following:

    ➔ First, open a terminal and use the following command below when your database file is in any other directory.

    mysql -u username -p new_database < /path/old_database.sql

    ➔ Use the command below if your database file is in the public_html directory.

    mysql -u username -p new_database < old_database.sql

    In this case: 

    ★ username: Your username of MYSQL.

    ★ new_database – A file name in which you want to import your old database file.

    ★ /path/old_database.sql – Full path to your .sql file or  old_database.sql file name

    When prompted, provide your MySQL credentials and complete the import process.

    Conclusion

    All of these provided solutions are the best for resolving the issue. We hope that they will be helpful for you in mitigating the problem.

  • 2023: Saraki breaks silence on PDP crisis, states position on Atiku’s candidacy

    2023: Saraki breaks silence on PDP crisis, states position on Atiku’s candidacy

    Former Senate President Bukola Saraki has reacted to the Peoples Democratic Party, PDP, crisis.

    In a post on his social media accounts on Saturday, the former presidential candidate stated that he had been working quietly behind the scenes to restore normalcy to the party.

    The main opposition party experienced an unusual crisis months ago, following the party’s primary election on May 29 in Abuja.

    Rivers State Governor Nyesom Wike and his supporters, who suspected foul play in the electoral process, demanded the resignation of PDP National Chairman Iyorchia Ayu, accusing him of plotting Wike’s defeat.

    Ayu’s refusal to resign has, however, deepened the crisis as Wike and his group vowed to work against the party’s presidential candidate, Atiku Abubakar in the forthcoming election.
    It was previously reported that Wike and some PDP stakeholders withdrew from Atiku’s campaign council a few days ago, insisting that Ayu resign before the party could receive their support.

    Read Also: Four killed, one rescued in Lagos collapsed building

    However, Saraki, who was also a candidate in the primary election, stated that Atiku remains the best option for the country.

    “I just returned from my annual vacation and went straight to Akwa Ibom to join the celebration of the state’s 35th anniversary,” he wrote.
    “As I moved around the country in the past few days, I got the feeling that many people are concerned over my seeming silence on recent developments in our party, the PDP.

    “My response is that there are times to speak and be heard and there are times when working silently behind the scenes is more productive. This is such a time.

    “PDP and Atiku Abubakar remain the best option for Nigerians in the 2023 polls”!

  • Six abductees escape as ISWAP terrorists flee

    Six abductees escape as ISWAP terrorists flee

    Six security personnel kidnapped by Islamic State of West African Province (ISWAP) terrorists in Borno State have been released.

    The operatives were abducted in the early hours of Saturday in Borno State’s North Eastern Gubio local government area.

    However, counter-insurgency expert Zagazola Makama claims the victims escaped after a military super Tucano fighter jet launched a fierce pursuit of the terrorists.
    According to Zagazola, the operation was carried out by gallant troops of the 5 Brigade Operation Hadin Kai, Gubio, backed by the Air Task Force (ATF) Super Tukano, who pursued the fleeing terrorists who ran towards the axis of Gadai village, Nganzai Local Government, Borno State.

    Read Also: Bandits Invade Zamfara Mosque, Kill 11 Worshippers during Friday Prayer

    According to Zagazola, the operation was carried out by gallant troops of the 5 Brigade Operation Hadin Kai, Gubio, backed by the Air Task Force (ATF) Super Tukano, who pursued the fleeing terrorists who ran towards the axis of Gadai village, Nganzai Local Government, Borno State.
    According to the source, the security personnel are safe, and some have returned to Gubio town, while another is on his way back.

    “They include one police officer, three Civilian Joint Task Force members, and two hunters,” he said.